Nutritional Information
Per serving (approximate values):
- Calories: 350
- Protein: 5g
- Carbohydrates: 38g
- Fat: 22g
- Fiber: 0g
- Sodium: 80mg
Ingredients
- 2 cups (480ml) heavy cream, very cold
- 1 (14-ounce/397g) can sweetened condensed milk, chilled
- 1 teaspoon pure vanilla extract
- 1/2 cup (120ml) strawberry puree (from about 6-8 fresh or frozen strawberries, pureed and strained)
- Optional: A few drops of red or pink food coloring (for vibrant pink color)
Instructions
- Before you begin, ensure your heavy cream and sweetened condensed milk are thoroughly chilled. This is crucial for achieving the best texture.
- In a large mixing bowl, pour the very cold heavy cream. Using an electric hand mixer or a stand mixer fitted with the whisk attachment, beat the heavy cream on medium-high speed until stiff peaks form. This means when you lift the beaters, the cream should hold its shape firmly. Be careful not to overbeat, as it can turn grainy.
- In a separate medium-sized bowl, combine the chilled sweetened condensed milk and the vanilla extract. Stir these together until well combined.
- Gently fold about one-third of the whipped cream into the sweetened condensed milk mixture. Use a spatula and a gentle motion to incorporate it, lightening the condensed milk base.
- Add the remaining whipped cream to the sweetened condensed milk mixture. Continue to fold gently until no streaks of white cream remain, and the mixture is uniform and airy. Be careful not to deflate the whipped cream, as the air is what gives the ice cream its light, creamy texture.
- Divide the ice cream base into two equal portions in separate bowls.
- To one portion, gently fold in the strawberry puree. If desired, add a few drops of red or pink food coloring to enhance the pink color. Mix until just combined, being careful not to overmix.
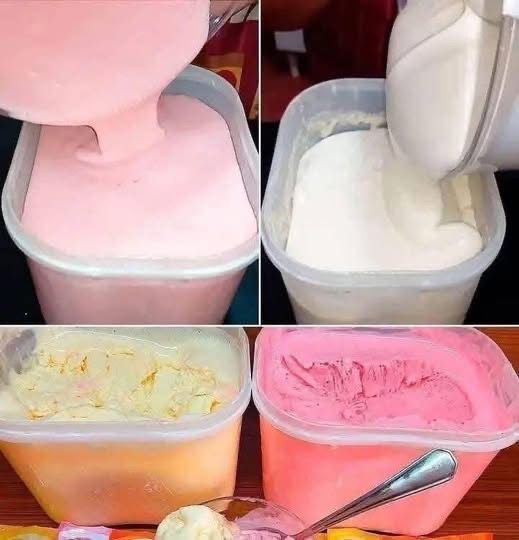
- Prepare a freezer-safe container, such as a loaf pan or a shallow airtight container.
- Spoon alternating dollops of the plain vanilla ice cream base and the strawberry ice cream base into the prepared container.
- Using a knife or a skewer, gently swirl the two flavors together a few times to create a marbled effect. Do not overmix, or the colors will blend entirely.
- Cover the container tightly with plastic wrap or a lid.
- Place the container in the freezer for at least 6 hours, or preferably overnight, until the ice cream is completely firm.
- When ready to serve, remove the ice cream from the freezer and let it sit at room temperature for 5-10 minutes to soften slightly, making it easier to scoop.
- Scoop and enjoy your homemade no-churn ice cream!